movie
Create animation sequences and movies
Synopsis
gmt movie mainscript -Ccanvassize -Nprefix -Tnframes|min/max/inc[+n]|timefile[+pwidth][+sfirst][+w[str]|W] [ -Aaudiofile[+e] ] [ -Ddisplayrate ] [ -Etitlepage[+d[duration[s]]][+f[i|o][fade[s]]][+gfill] ] [ -Fgif|mp4|webm|png[+ioptions][+l[n]][+ooptions][+sstride][+t][+v] ] [ -G[fill][+ppen] ] [ -Hscale] [ -Iincludefile ] [ -K[+f[i|o][fade[s]]][+gfill][+p[i|o]] ] [ -Llabelinfo ] [ -M[frame],[format][+rdpu][+v] ] [ -Pprogress ] [ -Q[s] ] [ -Sbbackground ] [ -Sfforeground ] [ -V[level] ] [ -W[dir] ] [ -Z[s] ] [ -fflags ] [ -x[[-]n] ] [ --PAR=value ]
Note: No space is allowed between the option flag and the associated arguments.
Description
The movie module can generate GMT animation sequences using a single-plot script that is repeated for all frames, with some variation using specific frame variables. The module simplifies (and hides) most of the steps normally needed to set up a full-blown animation job. Instead, the user can focus on composing the main frame plot and let the parallel execution of frames and assembly of images into a movie take place in the background. Individual frames are converted from PostScript plots to lossless, transparent PNG images and optionally assembled into an animation (this last step requires external tools that must be present in your path; see Technical Details below). The user can add title sequences, fading, labels, and progress indicators as desired.
Required Arguments
- mainscript
Name of a stand-alone GMT modern mode script that makes the frame-dependent plot. The script may access frame variables, such as frame number and others, and may be written using the Bourne shell (.sh), the Bourne again shell (.bash), the csh (.csh) or DOS batch language (.bat). The script language is inferred from the file extension and we build hidden movie scripts using the same language. Parameters that can be accessed are discussed below. Note: If the final gmt end statement ends with show then we display the movie master frame (but only if -M is active).
- -Ccanvassize
Specify the canvas size used when composing the movie frames. You can choose from a set of preset formats (see Table Presets) or specify a custom layout. Note: Your PROJ_LENGTH_UNIT setting determines if movie sets you up to work with the SI or US canvas dimensions. Instead of a named format you can request a custom format directly by giving widthxheightxdpu, where dpu is the dots-per-unit pixel density (pixel density is set automatically for the named formats). Alternatively, give dimensions in pixels and append modifiers +c or +i to indicate that dpu is per cm or per inches.
Preset format (alias)
Pixel dimensions
DPC
DPI
16:9 (24x13.5 cm or 9.6x5.4 inch)
4320p (8k and uhd-2)
7680 x 4320
320
800
2160p (4k and uhd)
3840 x 2160
160
400
1080p (fhd and hd)
1920 x 1080
80
200
720p
1280 x 720
53.3333
133.3333
540p
960 x 540
40
100
480p
854 x 480
35.5833
88.9583
360p
640 x 360
26.6667
66.6667
240p
426 x 240
17.75
44.375
4:3 (24x18 cm or 9.6x7.2 inch)
uxga
1600 x 1200
66.6667
166.6667
sxga+
1400 x 1050
58.3333
145.8333
xga
1024 x 768
42.6667
106.6667
svga
800 x 600
33.3333
83.3333
dvd
640 x 480
26.6667
66.6667
- -Nprefix
Determines the name of the final movie file and a sub-directory with frame images (but see -W). Note: If the subdirectory exist then we exit immediately. You are therefore required to remove any old directory by that name first. This is done to prevent the accidental loss of valuable data. You can prevent this issue by using -Z to delete the directory after a successful run.
- -Tnframes|min/max/inc[+n]|timefile[+pwidth][+sfirst][+w[str]|W]
Either specify how many image frames to make, create a one-column data set with values from min to max every inc , or supply a file with a set of parameters, one record (i.e., row) per frame. The values in the columns will be available to the mainscript as named variables MOVIE_COL0, MOVIE_COL1, etc., while any trailing text can be accessed via the variable MOVIE_TEXT. The number of records equals the number of frames. Note that the background script is allowed to create timefile, hence we check for its existence both before and after the background script has completed. Note: If just nframes is given then only MOVIE_FRAME is available as no data file is available. For details on array creation, see Generate 1-D Array. Several modifiers are also available:
+n indicates that inc is the desired number of frames from min to max instead of an increment.
+p can be used to set the tag width of the frame number format used in naming frames. For instance, name_000010.png has a tag width of 6. By default, this width is automatically set, but if you are splitting large jobs across several computers (via +s) then you must ensure the same tag width for all frame names.
+s starts the output frame numbering at first instead of 0. Note: All frames are still included; this modifier only affects the numbering of the specific frames on output.
+w will split the trailing text string into individual words that can be accessed via variables MOVIE_WORD0, MOVIE_WORD1, etc. By default we look for either tabs or spaces to separate the words. Append str to select other character(s) as the valid separator(s) instead. To just use TAB as the only valid separator, use modifier +W instead.
Optional Arguments
- -Aaudiofile[+e]
Add in an audio track (such as a narration), presumably of same length as the animation, but it can be shorter or longer. We place it starting at the first frame. Use +e to stretch the audio track to exactly fit the length of the animation (provided the scaling is not less than 0.5 or larger than 2.0).
- -Ddisplayrate
Set the display frame rate in frames per second for the final animation [24].
- -Etitlepage[+d[duration[s]]][+f[i|o][fade[s]]][+gfill]
Give a titlepage script that creates a static title page for the movie [no title sequence]. Alternatively, titlepage can be a PostScript or EPS plot (with file extension .ps) of dimensions exactly matching the canvas size set in -C. Modifiers control the attributes of the title sequence:
+d sets the duration of the title sequence. Append the number of frames or give a duration in seconds by appending s [Default is 4s].
+f adds fading. Append the fade length in frames or seconds (append s) [1s]. Use +fi and/or +fo to specify one-sided fading or to give two unequal fade intervals [Default is the same duration for both]. The fading affects the beginning and end of the title page duration.
+gfill sets an alternate terminal fade color [black].
See Fading for more details on fading (which also involves -K).
- -Fgif|mp4|webm|png[+ioptions][+l[n]][+ooptions][+sstride][+t][+v]
Select a video product. Repeatable to make more than one product. Choose from gif (animated GIF), mp4 (MPEG-4 movie), webm (WebM movie) or just png images (implied by all the others). If just png is chosen then no animation will be assembled. No -F means no video products are created at all; this requires -M. Several modifiers are available:
+i may be used to add additional FFmpeg encoding settings for the input file (in quotes if more than one word).
+l turns on looping for gif animations; optionally append how many times to repeat [infinite].
+o may be used to add additional FFmpeg encoding settings for the output file (mp4 or webm; in quotes if more than one word).
+s creates a crude animated gif provided either a mp4 or webm product has been selected. You can limit the frames being used to make a GIF animation by appending stride to only use every stride frame, with stride being one of a fixed set of strides: 2, 5, 10, 20, 50, 100, 200, and 500.
+t selects generation of transparent PNG images [opaque]; see Transparency for more details.
+v opens the movie in the default movie viewer.
- -G[fill][+ppen] (more …)
Set the canvas color or fill before plotting commences [no fill]. Optionally, append +p to draw the canvas outline with pen [no outline].
- -Hscale
Given the finite dots-per-unit used to rasterize PostScript frames to PNGs, the quantizing of features to discrete pixel will lead to rounding. Some of this is mitigated by the anti-aliasing settings. However, changes from frame to frame is outside the control of the individual frame rasterization and we find that, in particular, moving text may appear jittery when seen in the final animation. You can mitigate this effect by selecting an integer scale that, in effect, temporarily increases the effective dots-per-unit by scale, rasterizes the frame, then down-samples the image by the same scale at the end. The larger the scale, the smoother the transitions. Because processing time increases with scale we suggest you try values in the 2-5 range. Note that images can also suffer from quantizing when the original data have much higher resolution than your final frame pixel dimensions. The -H option may then be used to smooth the result to avoid aliasing [no downsampling]. This effect is called subpixel rendering.
- -Iincludefile
Insert the contents of includefile into the movie_init.sh script that is accessed by all movie scripts. This mechanism is used to add information (typically constant variable assignments) that the mainscript and any optional -S scripts rely on.
- -K[+f[i|o]fade[s]][+gfill][+p[i|o]] ]
Add fading in and out for the main animation sequence [no fading]. Modifiers can be used to change the attributes of the fading:
+f sets the fading attributes. Append the fade length in frames or seconds (append s) [Default is 1s]. Use +fi and/or +fo to specify one-sided fading or to give two unequal fade intervals [Default is the same duration for both].
+gfill sets an alternate terminal fade color [black].
+p preserves all frames. Normally, fading will be overlaid on the first and last fade frames of the main animation. Use +p to preserve these frames by fading over the repeated first and last animation frames instead. Append i or o to only preserve the frame involved during the fade in or fade out, respectively.
See Fading for more details on fading (which may also involve -E).
- -Llabelinfo[modifiers]
Automatic labeling of individual frames. Repeatable up to 32 labels. Places the chosen label at the frame perimeter:
e selects the elapsed time in seconds as the label; append +sscale to set the length in seconds of each frame [Default is 1/framerate].
sstring uses the fixed text string as the label.
f selects the running frame number as the label [Default].
p selects the percentage of progress so far.
ccol uses the value in column number col of timefile as label (first column is 0).
tcol uses word number col from the trailing text in timefile (first word is 0).
Note: If you use -Lc with an absolute time column, then the format of the timestamp will depend on the two default settings FORMAT_DATE_MAP and FORMAT_CLOCK_MAP. By default, both date and time are displayed (with a space between); set one of the settings to “-” to skip that component. Several modifiers control the appearance of the label:
+cdx[/dy] sets the clearance between label and bounding box; only used if +g or +p are set. Append units c|i|p or % of the font size [15%].
+f selects a specific font [FONT_TAG].
+g will fill the label bounding box with fill color [no fill].
+h[dx/dy/][shade] will place drop-down shade behind the label bounding box. You can adjust the offset with dx/dy [4p/-4p] and shade color [gray50]; requires +g [no shade].
+jrefpoint specifies where the label should be plotted [TL].
+odx[/dy] will offset the label in direction implied by justify. Append units c|i|p or % of the font size [20% of font size].
+p will draw the outline of the bounding box using selected pen [no outline].
+r in conjunction with +g or +p will select a rounded rectangular label box [straight].
+t sets a format statement to be used with the label item selected [no special formatting].
Note: If -Lt is used then the format statement must contain a %s-like format, else it may have an integer (%d) or floating point (%e, %f, %g) format specification (see C language printf syntax).
- -M[frame|f|m|l],[format][+rdpu][+v]
In addition to making the animation sequence, select a single master frame [0] for a cover page. The master frame will be written to the current directory with name prefix.format, where format can be one of the graphics extensions from the allowable graphics formats [pdf]. Instead of a frame number we also recognize the codes first, middle, and last frame. Note: For raster frame formats you may optionally specify an alternate dpu of that frame via the +r modifier [same dpu as the movie frames]. Finally, to open the master plot in the default viewer, append +v.
- -Pprogress[modifiers]
Automatic placement of progress indicator(s). Repeatable up to 32 indicators. Places the chosen indicator at the frame perimeter according to the justification selected. Select from six indicators called a-f [a]. Indicators a-c are different types of circular indicators while d-f are linear (axis-like) indicators. See Progress_indicators for details. Several modifiers control their appearance:
+a enables annotation for some progress indicators: Indicators b-f can optionally add annotations; append one of e|f|p|s|ccol|tcol to indicate what should be annotated (see -L for more information on what these are).
+f selects a specific font [FONT_ANNOT_SECONDARY scaled as needed].
+g sets the moving item fill color [see below for defaults].
+G sets the static item fill color [see below for defaults].
+jjustify sets the placement on the canvas [TR for circular and BC for axes].
+odx[/dy] offsets the indicator in direction implied by justify.
+ppen sets the moving item pen.
+Ppen sets the static item pen.
+sscale means we compute elapsed time as frame number times scale.
+tformat sets a C-format statement to be used with the item selected [none].
+wwidth sets the dimension of the indicator [5% of max canvas dimension for circular indicators and 60% of relevant canvas dimension (height or width depending on +j) for the linear indicators].
- -Q[s]
Debugging: Leave all files and directories we create behind for inspection. Alternatively, append s to only build the movie scripts but not perform any execution. One exception involves the optional background script derived from -Sb which is always executed since it may produce data needed when building the movie scripts.
- -Sbbackground
The optional GMT modern mode background (written in the same scripting language as mainscript) can be used for one or two purposes: (1) It may create files (such as timefile) that will be needed by mainscript to make the movie, and (2) It may make a static background plot that should form the background for all frames. If a plot is generated the script must make sure it uses the same positioning (i.e., -X and -Y) as the main script so that the layered plot will stack correctly (unless you actually want a different offset). Alternatively, background can be a PostScript or EPS plot layer of dimensions exactly matching the canvas size.
- -Sfforeground
The optional GMT modern mode foreground (written in the same scripting language as mainscript) can be used to make a static foreground plot that should be overlain on all frames. Make sure the script uses the same positioning (i.e., -X and -Y) as the main script so that the layers will stack correctly. Alternatively, foreground can be a PostScript or EPS plot layer of dimensions exactly matching the canvas size.
- -V[level]
Select verbosity level [w]. (See full description) (See technical reference).
- -W[dir]
By default, all temporary files and frame PNG file are created in the subdirectory prefix set via -N. You can override that selection by giving another dir as a relative or full directory path. If no path is given then we create a working directory in the system temp folder named prefix. The main benefit of a working directory is to avoid endless syncing by agents like DropBox or TimeMachine, or to avoid problems related to low space in the main directory.
- -Z[s]
Erase the entire prefix directory after assembling the final movie [Default leaves directory with all images; the temporary script files, parameter files, and layer PostScript files are all removed (but see -Q)]. If your mainscript and all input scripts via -E, -I, and -S should be deleted as well then append s.
- -f[i|o]colinfo (more …)
Specify data types of input and/or output columns.
- -x[[-]n]
Limit the number of cores used when making the individual frames. By default we try to use all available cores. Append n to only use n cores (if too large it will be truncated to the maximum cores available). Finally, give a negative n to select (all - n) cores (or at least 1 if n equals or exceeds all). The parallel processing does not depend on OpenMP. Note: One core is utilized by movie so in effect n-1 cores are used for the individual frames.
- -^ or just -
Print a short message about the syntax of the command, then exit (Note: on Windows just use -).
- -+ or just +
Print an extensive usage (help) message, including the explanation of any module-specific option (but not the GMT common options), then exit.
- -? or no arguments
Print a complete usage (help) message, including the explanation of all options, then exit.
- --PAR=value
Temporarily override a GMT default setting; repeatable. See gmt.conf for parameters.
Generate 1-D Array
We will demonstrate the use of options for creating 1-D arrays via math. Make an evenly spaced coordinate array from min to max in steps of inc, e.g.:
gmt math -o0 -T3.1/4.2/0.1 T =
3.1
3.2
3.3
3.4
3.5
3.6
3.7
...
Append +b if we should take \(\log_2\) of min and max, get their nearest integers, build an equidistant \(\log_2\)-array using inc integer increments in \(\log_2\), then undo the \(\log_2\) conversion. E.g., -T3/20/1+b will produce this sequence:
gmt math -o0 -T3/20/1+b T =
4
8
16
Append +l if we should take \(\log_{10}\) of min and max and build an array where inc can be 1 (every magnitude), 2, (1, 2, 5 times magnitude) or 3 (1-9 times magnitude). E.g., -T7/135/2+l will produce this sequence:
gmt math -o0 -T7/135/2+l T =
10
20
50
100
For output values less frequently than every magnitude, use a negative integer inc:
gmt math -o0 -T1e-4/1e4/-2+l T =
0.0001
0.01
1
100
10000
Append +i if inc is a fractional number and it is cleaner to give its reciprocal value instead. To set up times for a 24-frames per second animation lasting 1 minute, run:
gmt math -o0 -T0/60/24+i T =
0
0.0416666666667
0.0833333333333
0.125
0.166666666667
...
Append +n if inc is meant to indicate the number of equidistant coordinates instead. To have exactly 5 equidistant values from 3.44 and 7.82, run:
gmt math -o0 -T3.44/7.82/5+n T =
3.44
4.535
5.63
6.725
7.82
Alternatively, let inc be a file with output coordinates in the first column, or provide a comma-separated list of specific coordinates, such as the first 6 Fibonacci numbers:
gmt math -o0 -T0,1,1,2,3,5 T =
0
1
1
2
3
5
Notes: (1) If you need to pass the list nodes via a dataset file yet be understood as a list (i.e., no interpolation), then you must set the file header to contain the string “LIST”. (2) Should you need to ensure that the coordinates are unique and sorted (in case the file or list are not sorted or have duplicates) then supply the +u modifier.
If you only want a single value then you must append a comma to distinguish the list from the setting of an increment.
If the module allows you to set up an absolute time series, append a valid time unit from the list year, month, day, hour, minute, and second to the given increment; add +t to ensure time column (or use -f). Note: The internal time unit is still controlled independently by TIME_UNIT. The first 7 days of March 2020:
gmt math -o0 -T2020-03-01T/2020-03-07T/1d T =
2020-03-01T00:00:00
2020-03-02T00:00:00
2020-03-03T00:00:00
2020-03-04T00:00:00
2020-03-05T00:00:00
2020-03-06T00:00:00
2020-03-07T00:00:00
A few modules allow for +a which will paste the coordinate array to the output table.
Likewise, if the module allows you to set up a spatial distance series (with distances computed from the first two data columns), specify a new increment as inc with a geospatial distance unit from the list degree (arc), minute (arc), second (arc), meter, foot, kilometer, Miles (statute), nautical miles, or survey foot; see -j for calculation mode. To interpolate Cartesian distances instead, you must use the special unit c.
Finally, if you are only providing an increment and will obtain min and max from the data, then it is possible (max - min)/inc is not an integer, as required. If so, then inc will be adjusted to fit the range. Alternatively, append +e to keep inc exact and adjust max instead (keeping min fixed).
Parameters
Several parameters are automatically assigned and can be used when composing mainscript and the optional background and foreground scripts. There are two sets of parameters: Those that are constants and those that change with the frame number. The constants are accessible by all the scripts: MOVIE_WIDTH: The width of the canvas (the full movie frame), MOVIE_HEIGHT: The height of the canvas (the full movie frame), MOVIE_DPU: The current dots-per-unit, MOVIE_RATE: The current number of frames per second, MOVIE_NFRAMES: The total number of frames. Also, if -I was used then any static parameters listed there will be available to all the scripts as well. In addition, the mainscript also has access to parameters that vary with the frame counter: MOVIE_FRAME: The current frame number (an integer, e.g., 136), MOVIE_ITEM: The formatted frame number (a string, e.g., 000136), and MOVIE_NAME: The name prefix for the current frame (i.e., prefix_MOVIE_ITEM), Furthermore, if a timefile was given then variables MOVIE_COL0, MOVIE_COL1, etc. are also set, yielding one variable per column in timefile. If timefile has trailing text then that text can be accessed via the variable MOVIE_TEXT, and if word-splitting was explicitly requested by -T+w or implicitly by selecting word labels in -L or -P) then the trailing text is also split into individual word parameters MOVIE_WORD0, MOVIE_WORD1, etc.
Data Files
The movie scripts will be able to find any files present in the starting directory when movie was initiated, as well as any new files produced by mainscript or the optional scripts set via -S. No path specification is needed to access these files. Other files may require full paths unless their directories were already included in the DIR_DATA setting.
Custom gmt.conf files
If you have a gmt.conf file in the top directory with your main script prior to running movie then it will be used and shared across all the scripts created and executed unless your scripts use -C when starting a new modern mode session. The preferred ways of changing GMT defaults is via set calls in your input scripts. Note: Each script is run in isolation (modern) mode so trying to create a gmt.conf file via the preflight script to be used by other scripts is futile.
Plotting Temporal Changes
A movie is not very interesting if nothing changes. For the animation to change you need to have your mainscript either access a different data set as the frame counter changes, or you need to plot only a varying subset of a data set, showing only the part that should be displayed in each frame. There are several strategies you can use to accomplish these effects:
Your timefile passed to -T may have names of specific data files and you simply have your mainscript use the relevant MOVIE_TEXT or MOVIE_WORD? to access the frame-specific file name.
You have a single data table which includes absolute time for each record, and you wish to plot these events as time moves forward, yet not displaying events still in the future. This effect is achieved via the module events.
You have a 3-D grid (or a stack of 2-D grids) and you want to interpolate along the axis perpendicular to the 2-D slices (e.g., time, or it could be depth). In this situation you will use the module grdinterpolate to have the mainscript obtain a slice for the correct time (this may be an interpolation between two different times or depths) and make the frame plot with this temporary grid file.
You may be creating data on the fly using math or grdmath, or perhaps processing data slightly differently per frame (using parameters in the timefile) and displaying these or the changes between frames.
Your Canvas
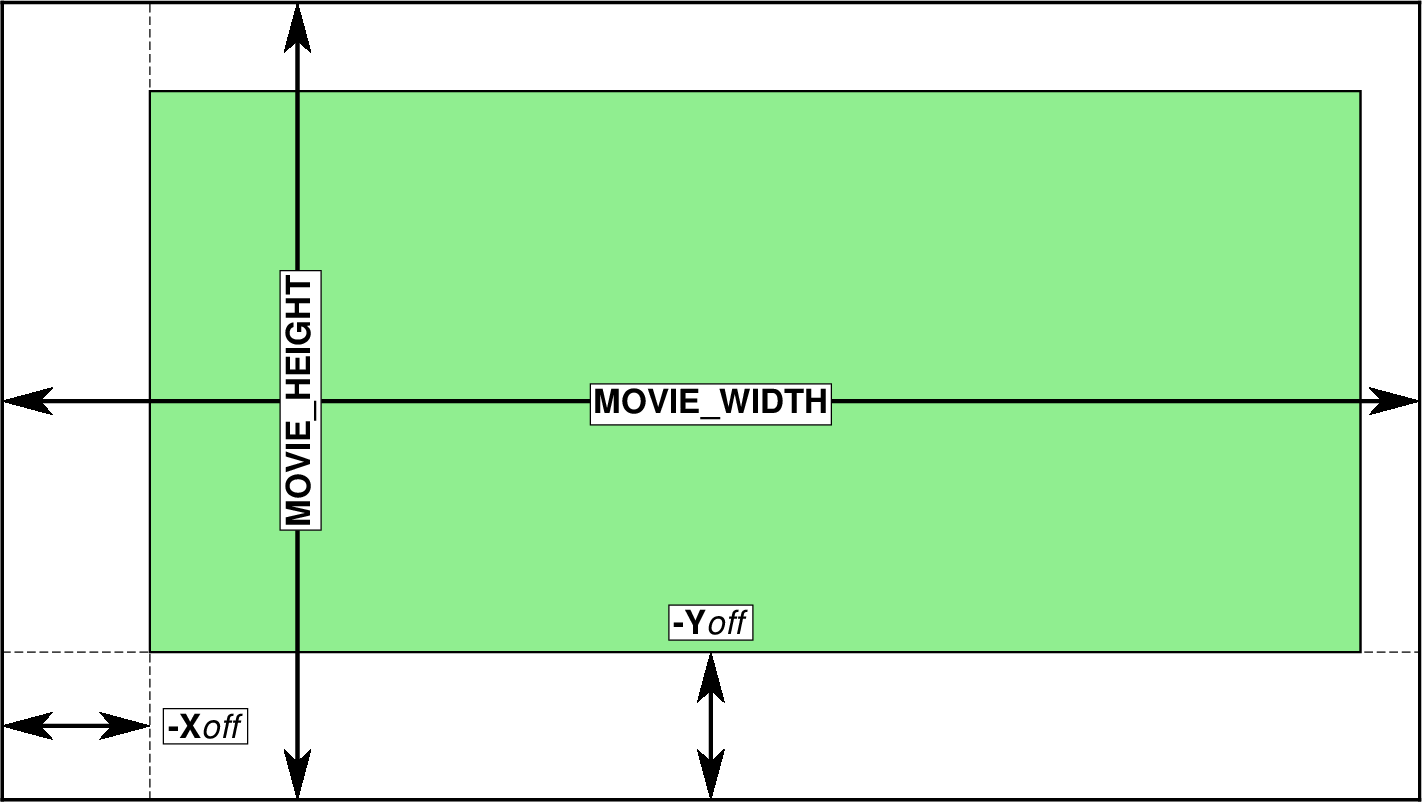
The MOVIE_WIDTH and MOVIE_HEIGHT parameters reflect your canvas dimension. You can use the regular -X and -Y options to set a logical origin for your intended plot [72p, 72p] and use your projection parameters (-J) to indicate the area selected for plotting (green).
As you can see from -C, unless you specified a custom format you are given a canvas size that is either 24 x 13.5 cm (16:9) or 24 x 18 cm (4:3). If your PROJ_LENGTH_UNIT setting is inch then the custom canvas sizes are just slightly (1.6%) larger than the corresponding SI sizes (9.6 x 5.4” or 9.6 x 7.2”); this has no effect on the size of the movie frames but allow us to use good sizes that work well with the dpu chosen. You should compose your plots using the given canvas size, and movie will make proper conversions of the canvas to image pixel dimensions. It is your responsibility to use -X and -Y to allow for suitable margins and any positioning of items on the canvas. To minimize processing time it is recommended that any static part of the movie be considered either a static background (to be made once by background; see -Sb) and/or a static foreground (to be made once by foreground; see -Sf); movie will then assemble these layers per frame. Also, any computation of static data files to be used in the loop over frames can be produced by background. Any data or variables that depend on the frame number must be computed or set by mainscript or provided via the parameters as discussed above. Note: Using the variables MOVIE_WIDTH or MOVIE_HEIGHT to set plot dimensions may lead to clipping against the canvas since these are also the exact canvas dimensions.
External PostScript Layers
Instead of passing GMT modern scripts to -S you can alternatively provide the name of PostScript plot layer files. Note that these must exactly match the canvas size. As a simple example, if you are making a HD movie using the US unit dimensions then a background pink layer would be created by:
gmt basemap -R0/9.6/0/5.4 -Jx1i -B+gpink -X0 -Y0 --PS_MEDIA=9.6ix5.4i -ps background
Note the canvas selection via PS_MEDIA, the matching region and projection, and the zero location of the origin.
Basemap Frames
Some map projections will by default draw a fancy map frame; this feature is under the control of MAP_FRAME_TYPE. However, whether a fancy or plain frame is actually drawn also depends on the projection center latitude. Thus, if your movie varies the projection center latitude by changing the view, you should set the frame setting to plain as part of your setup.
Transparent Images
By default, movie will build opaque PNG images which can then be assembled into an animation. The vast majority of movies is likely to be made that way. Use the -F option’s experimental modifier +t to make transparent PNG images. Currently, very few video codecs support transparency. It is claimed both H.265 (HECV) and VP9 (Webm) offer this capability; we have only been able to verify the latter by viewing a transparent webm movie in Chrome. Animated GIFs can be built from transparent PNGs as well and here each additional frame accumulate in the final movie. Experts may create transparent PNGs and create movies in professional tools that support a movie alpha channel.
Adding an Audio Track
Using -A[+e], you can include an audio track, such as narrating the animation or add music, or whatever you have on tap. The final movie will have a length matching the longest of the audio or animation, so you probably will want to process you audio file to fit your animation. Since the animation length is known to be n_frames / displayrate you can preprocess the audio track to have the matching length. Alternatively, if the audio track is approximately the same length as the video (within ±50% of animation length), append +e to scale the audio track to have the exact same length as the animation.
Technical Details
The movie module creates several hidden script files that are used in the generation of the images (here we have left the file extension off since it depends on the scripting language used): movie_init (initializes variables related to canvas size and dots-per-unit, and includes the contents of the optional includefile), movie_preflight (optional since it derives from -Sb and computes needed data files and possibly a background layer), movie_postflight (optional since it derives from -Sf and builds a foreground layer), movie_frame (accepts a frame counter argument and builds the frame image), and movie_cleanup (removes temporary files at the end of the run). For each frame there is a separate movie_params_###### script that provides frame-specific variables (e.g., frame number and anything given via -T). The pre- and post-flight scripts have access to the information in movie_init while the frame script in addition has access to the frame-specific parameter file. Using the -Q option will just produce these scripts which you can then examine. Note: The mainscript is duplicated per frame and each copy is run simultaneously on all available cores. Multi-treaded GMT modules will therefore be limited to a single core as well.
The conversion of PNG frames to an animated GIF (-Fgif) relies on GraphicsMagick. Thus, gm must be accessible via your standard search path. Likewise, the conversion of PNG frames to an MP4 (-Fmp4) or WebM (-Fwebm) movie relies on FFmpeg.
Shell Limitations
As we cannot control how a shell (e.g., bash or csh) implements piping between two processes (it often involves a sub-shell), we advice against using commands in your main script that involve piping the result from one GMT module into another (e.g., gmt blockmean ….. | gmt surface …). Because movie is running many instances of your main script simultaneously, odd things can happen when sub-shells are involved. In our experience, piping in the context of movie script may corrupt the GMT history files, resulting in stray messages from some frames, such as region not set, etc. Split such pipe constructs into two using a temporary file when writing movie main scripts. Note: Piping from a non-GMT module into a GMT module or vice versa is not a problem (e.g., echo ….. | gmt plot …).
Hints for Movie Makers
Composing movies is relatively simple but you have to think in terms of variables. Examine the examples we have described. Then, start by making a single plot script (your mainscript) and identify which things should change with time (i.e., with the frame number). Create variables for these values. If they are among the listed parameters that movie creates then use those names. Unless you only require the frame number you will need to make a file that you can pass to -T. This file should then have all the values you need, per frame (i.e., row), with values across all the columns you need. If you need to assign various fixed variables that do not change with time then your mainscript will look shorter and cleaner if you offload those assignments to a separate includefile (-I). To test your movie, start by using options -Q and -M to ensure your master frame page looks correct. This page shows you one frame of your movie (you can select which frame via the -M arguments). Fix any issues with your use of variables and options until this works. You can then try to remove -Q. We recommend you make a very short (i.e., -T) and small (i.e., -C) movie so you don’t have to wait very long to see the result. Once things are working you can beef up number of frames and movie quality.
Color Table Usage
Because movie launches individual frame plots as separate sessions running in parallel, we cannot utilize the current CPT (i.e., the last CPT created directly by makecpt or grd2cpt, or indirectly by grdimage or grdview). Instead, you must create CPTs using explicit files and pass those names to the modules that require CPT information. In modern mode, this means you need to use the -H option in makecpt or grd2cpt in order to redirect their output to named files.
Progress Indicators

The six types of movie progress indicators. All have default sizes, placements, colors and pens (shown) but these can be overridden by the corresponding modifiers (see below).
The letters a-f select one of the six progress indicators shown above; each has default attributes that can be changed via modifiers:
a needs a static [lightgreen] and moving [lightred] fill (set via +G and +g); there is no label option.
b takes a static [lightblue] and moving [blue] pen (set via +P and +p), and if +a is set we place a centered label with a font size scaled to 30% of indicator size (unless +f was set which is used as given).
c takes a static [dashed darkred, pen width is 1% of indicator size] and moving [red] pen (default pen width is 5% of indicator size) for a circular arrow (head size is 20% of indicator size), with a central label (if given +a) with a font size 30% of indicator size (unless +f was set which we will honor).
d takes a static [black] and moving [yellow, width 0.5% of length] pen for a rounded line with a cross-mark. If label is requested (+a) we use a font size that is twice the static pen thickness (unless +f was set).
e takes a static [red] and moving [lightgreen] pen. If labels are requested (+a) we use a font size that is twice the static pen thickness (unless +f was set).
f takes a pen for the static axis [black] and a fill for the moving triangle [red]; the triangle size is scaled to twice the axis width (see below), and a font size scaled to thrice the axis width.
Note for indicators d-f: If percentage labels are selected (+ap), then the axes display a unit label, otherwise no unit label is supplied. These indicators are horizontal for all justify codes except for ML and MR. The default pen thickness for the linear static lines is the smallest of 2.5% of their lengths and 8p (1.5% and 3p for f). If no size is specified (+w) then we default to 5% of canvas width for the three circular indicators and 60% of the relevant canvas dimension (height or width, depending on +j) for the linear indicators.
Title Sequence and Fading

The fade-level (0 means black, 100 means normal visibility) for the complete movie, including an optional title sequence.
The complete movie may have an optional leading title sequence (-E) of a given duration. A short section at the beginning and/or end of this duration may be designated to fade in/out via the designated fade color [black]. The main animation sequence may also have an optional fade in and/or out section (-K). Here, you can choose to fade on top of the animation or you can “freeze” the first and/or last animation frame and only fade over those static images (via modifier +p) in order to preserve the whole animation sequence.
Examples
To make an animated GIF movie based on the script globe.sh, which simply spins a globe using the frame number to serve as the view longitude, using a custom square 600 by 600 pixel canvas and 360 frames, place a frame counter in the top left corner, and place a progress indicator in the top right corner, try:
gmt movie globe.sh -Nglobe -T360 -Fgif -C6ix6ix100 -Lf -P
Here, the globe.sh bash script simply plots a map with coast but uses the frame number variable as the center longitude:
gmt begin
   gmt coast -Rg -JG${MOVIE_FRAME}/20/${MOVIE_WIDTH} -Gmaroon -Sturquoise -Bg -X0 -Y0
gmt end
As the automatic frame loop is executed the different frames will be produced with different longitudes. The equivalent DOS batch script setup would be:
gmt movie globe.bat -Nglobe -T360 -Fgif -C6ix6ix100 -Lf -P
Now, the globe.bat DOS script is simply:
gmt begin
   gmt coast -Rg -JG%MOVIE_FRAME%/20/%MOVIE_WIDTH% -Gmaroon -Sturquoise -Bg -X0 -Y0
gmt end
i.e., the syntax of how variables are used vary according to the scripting language. At the end of the execution we find the animated GIF globe.gif and a directory (called globe) that contains all 360 PNG images. Note that there is no information in the globe scripts that reflects the name of the plot, the canvas size, the dimensions of the rasterized PostScript, and so on. That information is hidden from the user; the actual movie scripts that execute are derived from the user-provided scripts and supply the extra machinery. The movie module automatically manages the parallel execution loop over all frames using all available cores.
Longer Examples
To explore more elaborate movies, see the Animations examples under our GMT Animations or view high-resolution movies on the GMT Youtube channel.
Other Movie Formats
As configured, movie only offers the MP4 and WebM formats for movies. The conversion is performed by the tool FFmpeg, which has more codecs and processing options than there are children in China. If you wish to run FFmpeg with other options, run movie with one of the two video formats. At the end it will print the FFmpeg command used. You can copy, paste, and modify this command to select other codecs, bit-rates, and arguments. You can also use the PNG sequence as input to tools such as QuickTime Player, iMovie, MovieMaker, and other commercial programs to make a movie that way.
Remaking Movie with Existing PNG Frames
Perhaps you made your movie and then decided you want to change the frame rate or adjust something else in how the movie is put together from all the still images. If you kept all the frame images then you do not have to rerun the whole render process. Assuming you want a MP4 movie and that you want to rerun just the ffmpeg command, here is an example:
ffmpeg -loglevel warning -f image2 -framerate 24 -y -i "mydir/myimages_%04d.png" -vcodec libx264 -pix_fmt yuv420p mymovie.mp4
This command is also written out when movie performs this step. For other movie formats you will need to consult the FFmpeg documentation. Note: On Windows, the percentage character is special (like the dollar sign under shells) so you will need to enter two (%%).
Manipulating Multiple Movies
If you are making a series of similar movies, you can use FFmpeg to paste and stitch them into a single movie. Assume we have four movies called movie_1.mp4, movie_2.mp4, movie_3.mp4, and movie_4.mp4, and you wish to combine them into a 2x2 panel showing the four movies simultaneously. You would first combine movies (1,2) and (3,4) horizontally, then combine the two resulting strips vertically:
ffmpeg -i movie_1.mp4 -i movie_2.mp4 -filter_complex hstack=inputs=2 top.mp4
ffmpeg -i movie_3.mp4 -i movie_4.mp4 -filter_complex hstack=inputs=2 bottom.mp4
ffmpeg -i top.mp4 -i bottom.mp4 -filter_complex vstack=inputs=2 four_movies.mp4
For more information on such manipulations, see the FFmpeg documentation.
Deprecations
6.3.0: Consolidate -A into -F for a more unified option. #5613
macOS Issues
Note: The limit on the number of concurrently open files is relatively small by default on macOS and when building numerous frames at the same time it is not unusual to get failures in movie jobs with the message “Too many open files”. We refer you to this helpful article for various solutions.
References
Wessel, P., Esteban, F., & Delaviel-Anger, G. (2024). The Generic Mapping Tools and Animations for the Masses. Geochemistry, Geophysics, Geosystems, 25(6). https://doi.org/10.1029/2024GC011545